Installing Python and Tensorflow with Jupyter Notebook Configurations
Want to share your content on python-bloggers? click here.
For a machine or deep learning modeling, Python is widely used with Tensorflow. This post explains the an installation of Python, Tensorflow and configuration of Jupyter notebook as a kickstart towards ML/DL modeling.
Python, Tensorflow, Jupyter Notebook
It is common to use Anaconda for installing Python since a variety of packages (i.e. sklearn, pandas and so on) are installed automatically. Without Anaconda, we need to install Python and lots of package manually.
After installing Anaconda, Tensorflow is installed since Anaconda does not contain Tensorflow. Next we modify the default directory for Jupyter Notebook for our working directory.
Tensorflow is of two kinds : CPU and GPU version. This post only deal with CPU version since my laptop does not have GPU and I can’t test it. Instead, I use Google Colab when GPU Tensorflow is necessary.
Python programming is usually done with user-defined virtual environments which are constructed with some specific version of Python or Tensorflow. This approach helps you avoid version conflicts. But, for the time being, it is not necessary. This will be covered when it is necessary.
A whole process of installing Python is as follows.
|
Install Python
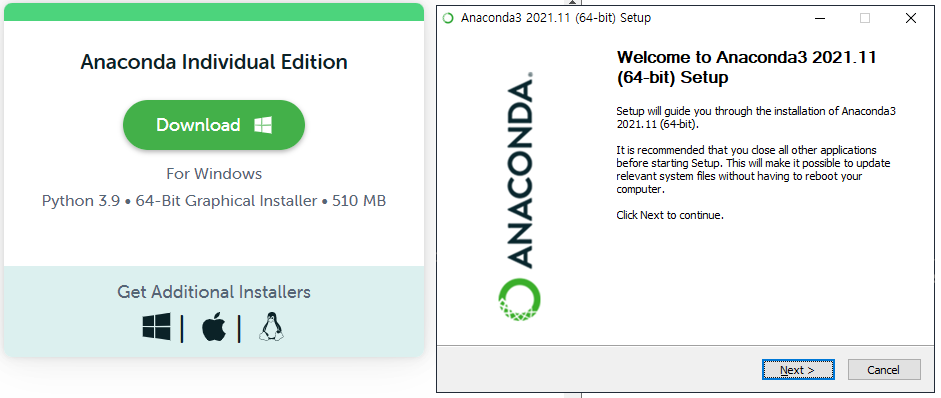
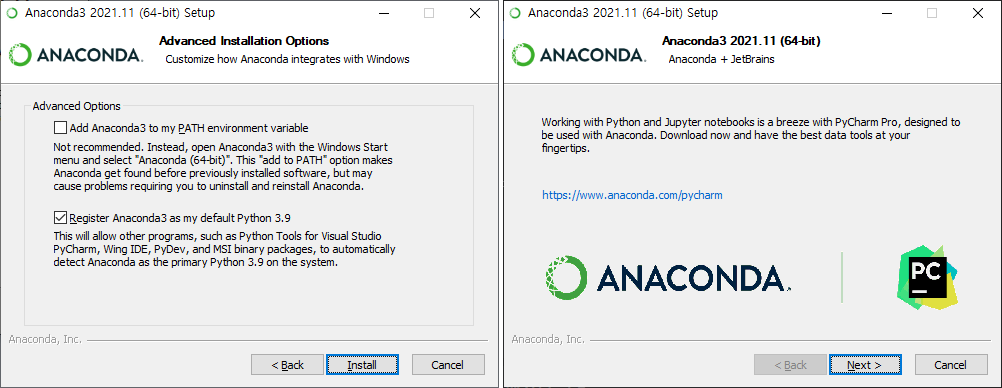
Download the recent Anaconda (Python 3.9 • 64-Bit Graphical Installer for Windows) at https://www.anaconda.com/products/individual and install it (Anaconda3-2021.11-Windows-x86_64.exe). Follow the instructions below with default settings (Yes or Next).

When installation is finished, we can find the new menu items like the above figure.
To check for whether Python is installed correctly, let’s run a sample Python code. To this end, click Spyder (anaconda3) or Anaconda Navigator (anaconda3) ➜ Spyder button and run the next sample code for a testing purpose.
Spyder is an IDE tool like R studio. PyCharm or Visual Studio Code is widely used also. You can select a favorite tool which fit you.
import numpy as np import matplotlib.pyplot as plt from sklearn import svm xx, yy = np.meshgrid(np.linspace(–3, 3, 500), np.linspace(–3, 3, 500)) np.random.seed(0) X = np.random.randn(300, 2) Y = np.logical_xor(X[:, 0] > 0, X[:, 1] > 0) # fit the model clf = svm.NuSVC(gamma=“auto”) clf.fit(X, Y) # plot the decision function for each datapoint on the grid Z = clf.decision_function(np.c_[xx.ravel(), yy.ravel()]) Z = Z.reshape(xx.shape) plt.imshow( Z, interpolation=“nearest”, extent=(xx.min(), xx.max(), yy.min(), yy.max()), aspect=“auto”, origin=“lower”, cmap=plt.cm.PuOr_r, ) contours = plt.contour(xx, yy, Z, levels=[0], linewidths=2, linestyles=“dashed”) plt.scatter(X[:, 0], X[:, 1], s=30, c=Y, cmap=plt.cm.Paired, edgecolors=“k”) plt.xticks(()) plt.yticks(()) plt.axis([–3, 3, –3, 3]) plt.show() | cs |
As can be seen in the following results with a figure, we can find that Python is installed correctly

Install Tensorflow
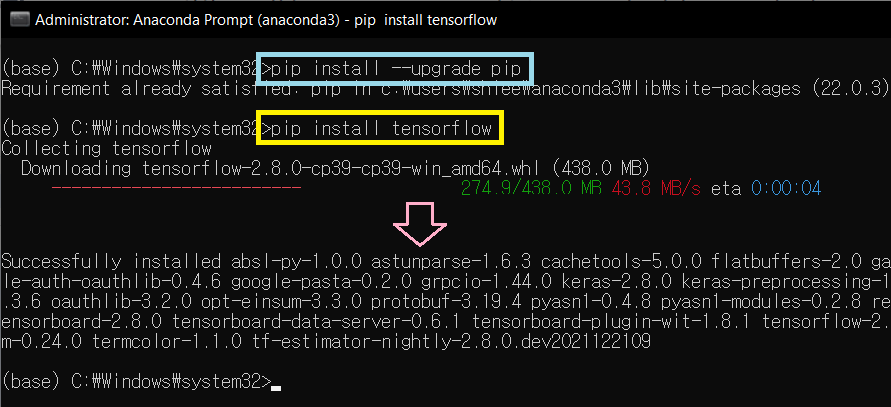
To install Tensorflow, click Anaconda Prompt (anaconda3) as administrator and type two commands sequentially. In particular, Tensorflow requires the latest updated pip which is the Python installation command.
|

To see if Tensorflow is installed properly, run the following sample code in Spyder.
# -*- coding: utf-8 -*- # TensorFlow and tf.keras import tensorflow as tf # Helper libraries import numpy as np import matplotlib.pyplot as plt fashion_mnist = tf.keras.datasets.fashion_mnist (train_images, train_labels), (test_images, test_labels) \ = fashion_mnist.load_data() class_names = [‘T-shirt/top’, ‘Trouser’, ‘Pullover’, ‘Dress’, ‘Coat’,‘Sandal’, ‘Shirt’, ‘Sneaker’, ‘Bag’, ‘Ankle boot’] plt.figure() plt.imshow(train_images[0]) plt.colorbar() plt.grid(False) plt.show() train_images = train_images / 255.0 test_images = test_images / 255.0 plt.figure(figsize=(10,10)) for i in range(25): plt.subplot(5,5,i+1) plt.xticks([]) plt.yticks([]) plt.grid(False) plt.imshow(train_images[i], cmap=plt.cm.binary) plt.xlabel(class_names[train_labels[i]]) plt.show() model = tf.keras.Sequential([ tf.keras.layers.Flatten(input_shape=(28, 28)), tf.keras.layers.Dense(128, activation=‘relu’), tf.keras.layers.Dense(10) ]) model.compile(optimizer=‘adam’, loss=tf.keras.losses.SparseCategoricalCrossentropy(\ from_logits=True), metrics=[‘accuracy’]) model.fit(train_images, train_labels, epochs=10) test_loss, test_acc = model.evaluate(test_images, test_labels, verbose=2) print(‘\nTest accuracy:’, test_acc) | cs |
From the following output, we can confirm that Tensorflow is installed correctly without any problem.

Modify configurations of Jupyter Notebook
Jupyter notebook is an interactive tool which is widely used for educational or serious analytical purposes. When we click Jupyter Notebook (anaconda3) or Anaconda Navigator (anaconda3) ➜ Jupyter Notebook button , its startup page is set to a default directory which is not our working directory and Chrome is not a default browser.
To change its default directory to our favorite working directory and use Chrome as browser, two things are modified. In my case I want Jupyter to be run at D:\py_env with Chrome.
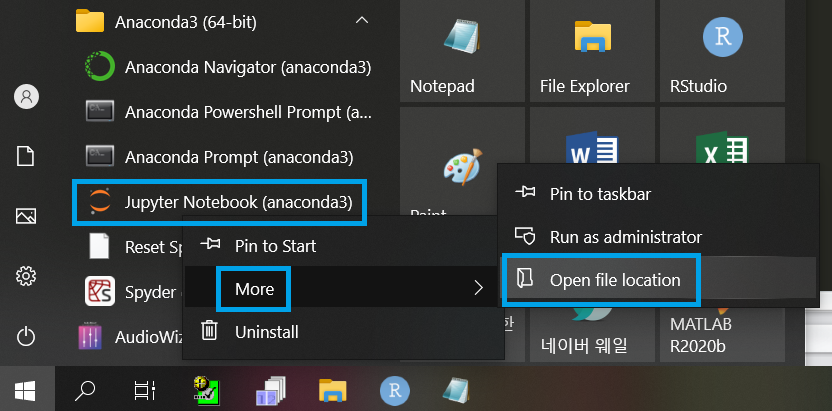
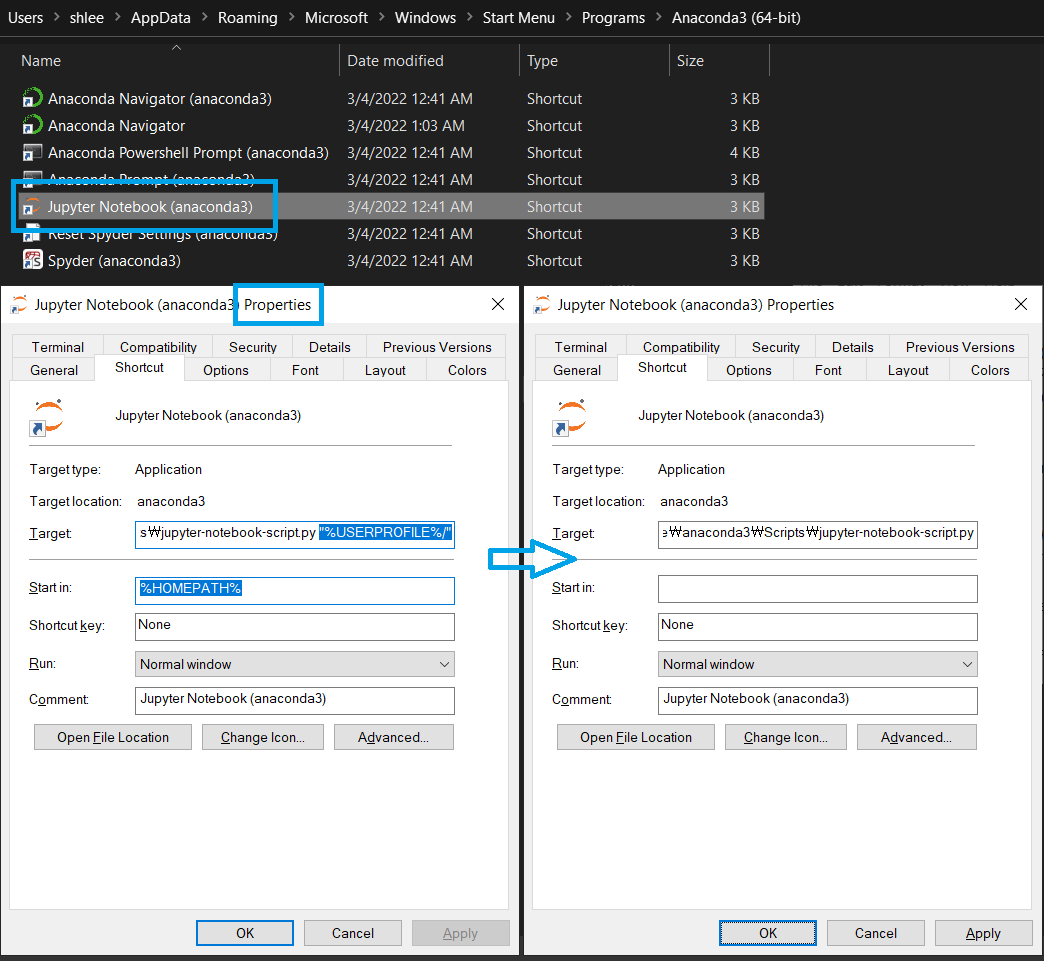
At first, like the next figure,
Window Start button ➜ Anaconda3(64-bit) ➜ Jupyter Notebook (ananconda3) ➜ mouse right click More ➜ Open file location
When the target folder is opened, right click the linker to Jupyter Notebook (anaconda3) ➜ Select Properties and delete two things like the next figure.
|
Then, we need to generate configuration file by typing and entering the next command at Anaconda Prompt.
|
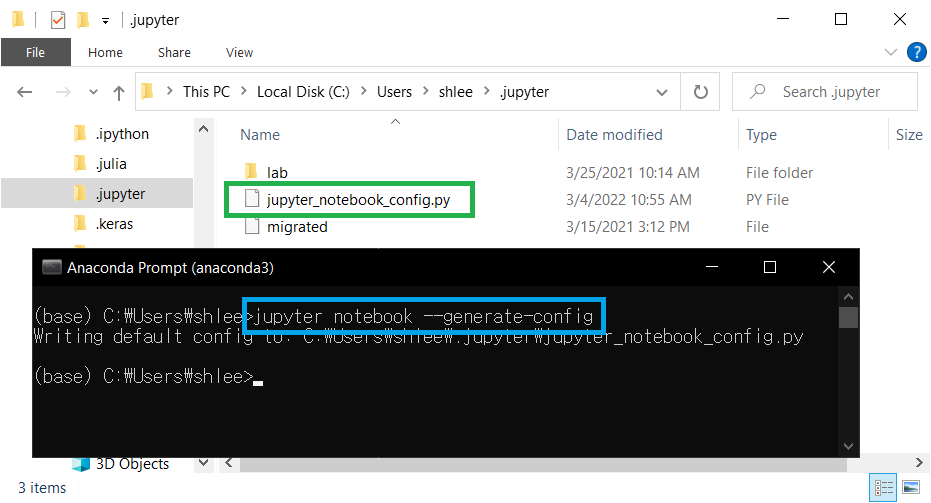
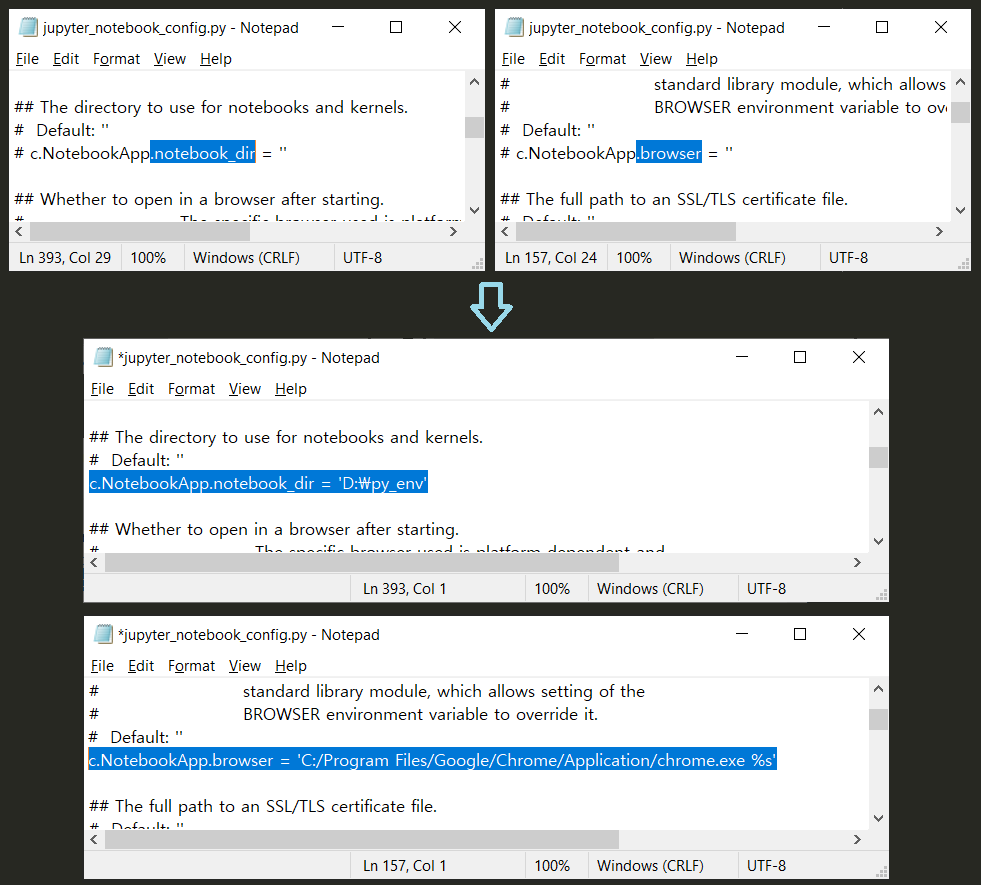
The generated configuration file is located at C:\Users\ your-user-id \.jupyter\ . Open jupyter_notebook_config.py using a notepad and modify the following two things for your favorite ones.
|
It is worth noting that delete # for each two lines before the modifications and use “/” as a delimiter of a browser address.
Close and rerun Jupyter notebook. We can start it at our working directory.

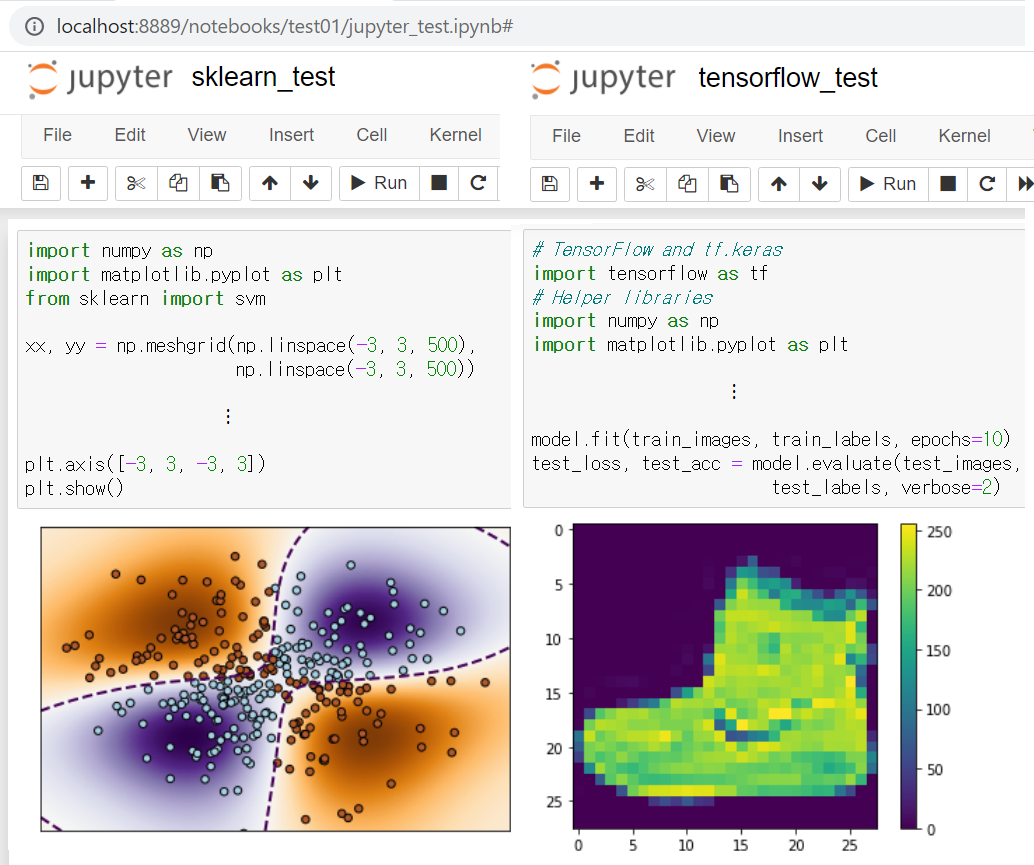
We can also test whether the same sample codes above are running correctly in this Jupyter notebook. To create a new notebook, click New (which is located at the right combo menu) and select Python 3 (ipykernel).
As can be seen in the screen captures below, two Python programs with sklearn or Tensorflow deliver the same results as expected. I deleted some block of redundant codes only when screenshots are captured
Concluding Remarks
This post dealt with an installation of Python with Tensorflow and configurations of Jupyter notebook. To see if Python is installed correctly, two sample codes using sklearn or Tensorflow are tested in Spyder and Jupyter notebook. From now on, we can concentrate on ML/DL modeling itself. \(\blacksquare\)
Want to share your content on python-bloggers? click here.